本文最后更新于 2095 天前,其中的信息可能已经有所发展或是发生改变。
自从因为 SSD 损坏丢失过一次数据后,我就进入了一种无比焦虑的状态。

首先是把所有电脑上的数据通过 Nextcloud 随时备份,然后又入了 office365,每周再把服务器上的备份上传到 OneDrive。
做完这一套之后也算是稍微安心了一些
直到前几天看到一篇讲密码安全的文章,又让我焦虑了起来,文章中的容易破解的点我都中了:简单,无特殊字符,无大小写,全部账户同一套密码
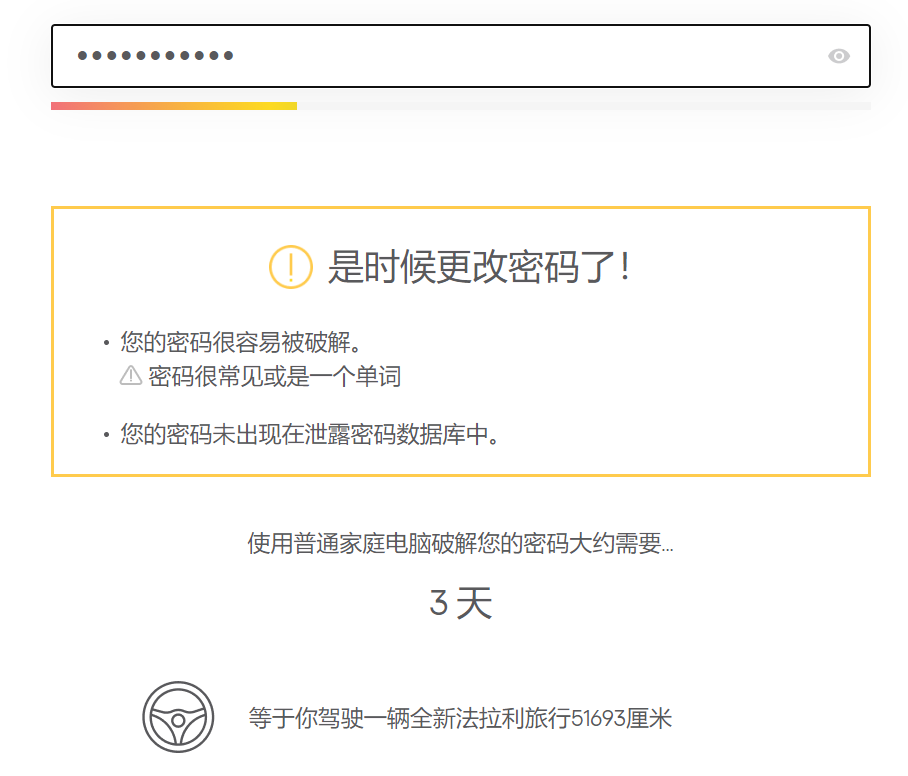
通过这个 网站 一测,发现我的密码非常不安全:
于是我当即决定重新设定一个足够复杂的密码,然后把所有账户的密码都改了。
然后使用自建的 Bitwarden 进行管理
一个好的密码应该是怎样的?
一个好的密码应该满足以下几点:
- 长度应该足够长
- 组合足够复杂,包含大小写字母,数字,特殊字符
- 每一个账户都不一样
- 即便得知你的所有个人信息也无法推算出来
- 便于记忆
其实最后一点可以不要,有许多工具的自动生成密码已经足够难以破解了,并且 Bitwarden 的自动填写密码足够好用。
但便于记忆是为了防止万一 Bitwarden 服务挂了,那可就非常难受了
根据以上几点,我想出了一套密码组合:特定地点+坐标+平台+特殊字符
这个特定地点只有你知道,字母大小写你可以任意设定,坐标这个数字即使你忘了也随时可查,每个平台都用你的方法记忆,也可以加大小写设定。
当然顺序你也可以自行调换
例如:
qinghua40116Wx,.?

安全性提高了非常多:

搭建 Bitwarden
首先需要安装 Docker
sudo apt-get update

sudo apt-get install \
    apt-transport-https \
    ca-certificates \
    curl \
    gnupg-agent \
    software-properties-common

curl -fsSL https://download.docker.com/linux/ubuntu/gpg | sudo apt-key add -

sudo add-apt-repository \
   "deb [arch=amd64] https://download.docker.com/linux/ubuntu \
   $(lsb_release -cs) \
   stable"

sudo apt-get update
sudo apt-get install docker-ce docker-ce-cli containerd.io
配置 https (不配置无法注册,不知道是不是只有我这样)
apt install apache2

启用如下模块
sudo a2enmod ssl
sudo a2enmod proxy
sudo a2enmod proxy_wstunnel
sudo a2enmod proxy_http
sudo a2enmod rewrite
sudo a2enmod headers

vim /etc/apache2/sites-available/bitwarden.conf

将以下内容复制进去
<VirtualHost *:80>
    # The ServerName directive sets the request scheme, hostname and port that
    # the server uses to identify itself. This is used when creating
    # redirection URLs. In the context of virtual hosts, the ServerName
    # specifies what hostname must appear in the request's Host: header to
    # match this virtual host. For the default virtual host (this file) this
    # value is not decisive as it is used as a last resort host regardless.
    # However, you must set it for any further virtual host explicitly.
    ServerName xxxxx.com #域名

    ServerAdmin webmaster@localhost
    DocumentRoot /var/www/
    ProxyPass "/" "http://127.0.0.1:3112/"
 #端口自行修改

    # Available loglevels: trace8, ..., trace1, debug, info, notice, warn,
    # error, crit, alert, emerg.
    # It is also possible to configure the loglevel for particular
    # modules, e.g.
    #LogLevel info ssl:warn

    ErrorLog ${APACHE_LOG_DIR}/error.log
    CustomLog ${APACHE_LOG_DIR}/access.log combined

    # For most configuration files from conf-available/, which are
    # enabled or disabled at a global level, it is possible to
    # include a line for only one particular virtual host. For example the
    # following line enables the CGI configuration for this host only
    # after it has been globally disabled with "a2disconf".
    #Include conf-available/serve-cgi-bin.conf
</VirtualHost>

启用配置文件
cd /etc/apache2/sites-enabled
sudo ln -s ../sites-available/bitwarden.conf
sudo service apache2 restart

获取证书
wget https://dl.eff.org/certbot-auto
chmod a+x certbot-auto
sudo ./certbot-auto --apache
启动
docker pull bitwardenrs/server:latest
docker run -d --name bitwarden -v /bw-data/:/data/ -p 3112:80 bitwardenrs/server:latest #端口和 apache2 保持一致
启动之后注册密码,如果你只是自己一个人用,注册完后禁止注册:
docker stop bitwarden

docker ps -a

删除
docker rm id
禁止注册
docker run -d --name bitwarden -e SIGNUPS_ALLOWED=false -v /bw-data/:/data/ -p 3112:80 bitwardenrs/server:latest至于使用没啥好说的,软件都写得很细,全平台都有,chrome也有插件。
目前用了几天感觉很不错,尤其是两步验证也可以添加在 Bitwarden 上,每次登陆都不需要专门打开手机查看了,很舒服